Tuesday, October 20, 2009

Fall view from Avens Springs

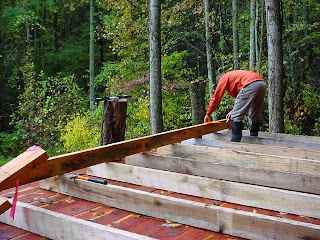
The micro-mansion comes to life


Ira and the view of the East wall.

Raise the Roof!!!


I bought rough-sawn lumber from Sunrise Sawmill in Asheville. The owner told me all the trees they mill are cut from privately owned land (none from Forest Service land). We precut all the wood to size at Ira's shop in town.

Cedar deck is laid & walls are up!


I bought some South Carolina cedar from a guy in Rutherfordton who harvested it from his land. It was milled into 1" thick rough-sawn boards and smells incredible. We used it for the decking on the chalet & the rest will be used to line the walls of the shower. Ira & I put up all four walls in 8 hours. We barely noticed the drizzling rain & finished with a hammer in one hand and a lantern in the other.

Sunday, October 4, 2009

Workshop conception


Six posts 4 black locust & 2 oaks (felled on site), moved by hand, set in gravel (dug on site). Ira & Quetzal standing proud.

Monday, August 10, 2009

Barter for Life


At the end of the market I always trade with other vendors for my food for the week. Last Saturday I traded some of my raw chocolate and one of the sprout salads for this cache of cukes! They were incredible. I pickled half of them with some ripe chili peppers from my neighbors front yard, caraway seeds, fennel which I also bartered for and alaea salt from Hawaii. The rest were used in gazpacho: The abundance of tomatoes in my yard and my neighbors has allowed me to make gazpacho a daily treat for the past two weeks!

The North Asheville Tailgate Market


The income from my minibusiness - Avens Organics - funds this project. I grow microgreens for local restuarants and the public. I sell them at the farmers market at UNCA campus, Parking Lot C every Saturday from 8am till Noon. I also make organic raw vegan chocolate, sprouted buckwheat energy bars and flax crackers which are sold at the market and at Greenlife Grocery (Merrimon Av.), French Broad Food Coop (Biltmore Av) and the Grove Corner Market (West Asheville on Haywood Rd.).
Photo by Kristen Stanton

Sunday, August 9, 2009

Micro "Cruck" Timberframe


This will be the first livable structure to be completed.

"This is an 8’x10’ Cypress English style “Cruck” timber frame. Cruck framing began in Europe when all the straight timbers were saved for use in ship building. People began using the bent or crooked trees that grew along rivers and streams for the main beams to support the roofs of their small houses. This is a very “Green” and organic type of construction in that the curved trees are not wanted by sawmills. These trees are often left to rot in the woods or burned after they are cut. All of our wood for these structures come from local forests and have minimal processing so they have a very low carbon footprint. Our work is done by hand and not by a computer driven machine, so again it is a very environmentally friendly form of construction.

This frame was made for display in a local Home and Garden Show. It has a 6” overhang on the sides with a 14:12 Roof pitch. Construction is mortise and tenon connections fasten with wooden pegs. The Cypress timbers are Roughsawn with a wire brushed finish, surface applied Sodium Borate (Borax) for a preservative, and 2 coats of Penofin Cedar Oil applied for a sealer. While Cypress is fairly rot resistant, the sodium borates add additional protection and will work as long as water repellent finish is maintained". www.timberfab.net

This frame will serve as the second floor of a microhouse; the basement will have three cinderblock walls built into the hillside. The south facing wall of the basement will be made of slipstraw (clay slip mixed with straw) and several windows:
Slip-straw is another good use for straw. It is the combination of clay and straw to insulate wall cavities. The straw is hand-tossed with slip, which is watered clay, then packed into the walls that have temporary forms up. Not all the seeds are removed from the straw before it gets bailed so seeds start sprouting from the walls days later. What’s really cool is that we won’t need a moisture tester to tell us when the slip-straw is dry inside because the sprouts will tell us when they die. Once that happens, in at least 3 weeks, it’s time for lime plaster.
http://www.sustainablebuilding2009.ca/2009/07/12/animal-tracks-and-slip-straw/
A french drain will surround the three side of the structure. Wire mesh will cover the outside of the block walls and several inches of gravel will separate it from the earth.

Macro Timberframe South Wall Elevation


Drawing by Ira Friedrichs

Macro Timberframe Bent Elevation


Drawing by Ira Friedrichs

Topographic Map

Ortho Map

Contextual Map

Thursday, August 6, 2009

The Source-Tapped


After cleaning out the gravel, clay and sand I allowed the sediment to settle for one day before pouring a layer of clean gravel on the bottom, where I placed the perforated end of 3/4" PEX tubing with a plug in the top-above where I drilled out holes to allow the water to pass, I covered it with a piece of screen and a rubber band. The dam rests on top of the PEX. 200' of tubing was laid in the creek bed where water still flows. At that point I connected a T connection to flow to the tank near the shower and to the tank near the tent. When I measured the flow in March it was 1/2 Liter/Minute. In this photo the pool looks nearly dry because most of the water was filling up the empty tube since I had just laid it into the pool. This water tastes Alive & AMAZING!

The Source


Although difficult to see, the water is coming out just above the sandstone rock. This rock (to the lower left) is very soft and could likely be drilled into. My desire is to tamper as little as possible with the spring and the creekbed it feeds. A few days ago as I dug out the small pool the spring head feeds I found a salamander who rested in my hand for a bit, seemingly relaxed. I dug out the pool by hand and used the gravel and clay to build a small dam.

Nearly complete


The exterior of the shower will be covered with the debarked exteriors of the milled trees from on site. The walls will be insulated - either with styrofoam reclaimed from bike shops or with mylar coated bubble wrap I reclaimed a few years ago from Whole Foods Floral and Produce Department. The braces will be removed once both doors have been hung. To take full advantage of the extra height and to add stability, a pull up bar will be hung inside the shower. This will help use up all remaining energy at the end of each day.
In the background, to the let you can see one of the 260 gallon water tanks, which we places on a shelf we dug out of the hillside-we used a trunk on the downhill side which we packed with dirt, clay and rocks to form a solid foundation. As I write this the tank is being filled with water from the spring.

The Hightower Shower gets Covered


This reclaimed piece of plywood will serve as part of the roof, it will be bordered by two smaller pieces which will cover each door-that's right, two doors for semi-open-air showers on those warm days. The roof will be topped with a rubber membrane, possibly the type used in ponds and living roofs. If anyone knows of a reclaimed material we could use let me know.

MacroPostholes for MicroHouse


The digging bar is truly a marvel of appropriate technology; here Mike is putting it to good use to make one of three postholes (8" x 20" on the south-facing side) in wet, rocky-clay earth which will serve as load-bearing support for the structure.

Flat Roof for Relax Time!

4 Pallets = 2 Walls


To make up for the downhill drop, Ira attached two short pieces of reclaimed 4'x4's with reclaimed Simpson brackets to the top of the downhill 4'x4's for a flat base for the roof.

Micro Footprint


The 8' x 10' foundation is 24" deep and 24" wide.

Attaching the pallets to the posts

Microhouse foundation & Pallet Shower


While Ira finished up the shower Mike & I finished digging the foundation for the microhouse.

The Last Steps

Wednesday, July 29, 2009

The final touch for the floor


One side fit snug and the other needed a bit more chiseling.

A perfect fit


In order to get the perfect fit Ira shaves off wood with the tip of the bar.

Preparing the trestles


Ira is cutting the ledgers that will rest on the posts.

Preparing the posts


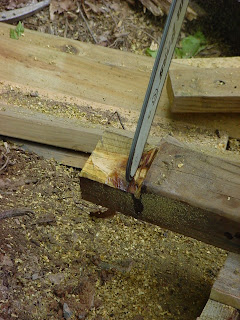
Ira scored the posts - 1" deep by 3.5" wide and cut into those spaces with the saw. We hammered out the pieces that were left and chiseled out the remaining wood to size.

Pallet-Shower Construction


Here Ira is digging a posthole: These will hopefully be the last pieces pressure treated wood we use. Future posts will be made from black locust trunks which are resistant to rot and do not require the use of cement. Instead, road bond gravel can be used which helps prevent wood rot better than cement. Cement is so caustic that untreated wood will deteriorate. A good treatment for wood is borax (1 quart of borax mixed with 1 gallon of warm water and sprayed on moist wood). Due to the square pallets and a time constraint. The shower will allow us to comfortably stay overnight and motivate us to build a sauna asap. We are using oak pallets which once carried sacks of cement. These were reclaimed from a local hardware store.

"Hardwood lumber, such as oak, was used for 67 percent of the wood in pallets at the turn of the twenty-first century. Manufacturers used a total of 4.41 billion board feet of hardwood lumber for pallets. Other wood materials used included stumpage, logs, and cants. Waste materials were sometimes used by pallet manufacturers to make fuel wood, bedding, pulp, or charcoal, among other products".
for more info: http://www.answers.com/topic/wood-pallets-and-skids